May 2021

Piano teacher and student

How Do Children Learn Piano?

How do young children learn to play the piano? Playing the piano and reading the notes simultaneously requires multiple skills that may be challenging for students under seven. Tip #10 is the best way to teach a young beginning piano student.  

Learning to play the piano requires learning the key names, playing them, and reading music, all at the same time. Learning all these skills simultaneously may be unrealistic for a child under seven. It may cause the student frustration and quit even before they’ve begun. 

Children Learn Piano
https://youtu.be/CGHzAYKk3DQ
Children Learn Piano

There are many piano method books for young students that offer different approaches. 

  •  There is a method called “rote learning,” a “copycat” type of learning. The teacher will play specific notes, and the student will play back what they’ve heard. There is some value in learning this way since a child at this age has learned everything by watching and copying. And it helps them to play songs right away, which keeps their interest. However, I don’t consider this a long-term teaching technique since they may not understand what they’re playing. It also doesn’t teach reading skills.
  • Another method is learning the notes by pattern numbers. However, this is also not effective long-term since most songs are not written out in pattern numbers.
  • Some method books use animal characters to teach fun activities that may not directly help teach the student to play. Even though it’s fun for the student, I feel this is a waste if too much time is spent on these activities.  
  •  Some books start with playing the black keys only with finger numbers. Playing this way doesn’t teach the key name and is not realistic to playing the piano.
  • Some books start with the middle C hand positions, where both thumbs awkwardly share middle C, then skip to other hand positions before the student has the chance to master each one.
  • Another method book offers colors for each key to play songs instead of the key name. In my view, this is an example of another waste of time and learning, since this is not used in reading music.

Children Piano Book
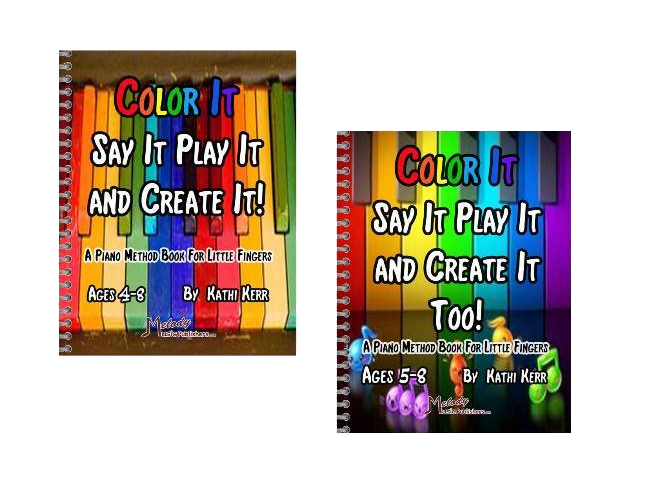
At Melody Music Publishers, we have two books for ages 4-8 called “Color It Say It Play it and Create It,” a 60-page book, and Color It Say It Play It and Create It Too”, a 50-page book. They’re taught for children to learn piano with clear steps that start with one concept and incrementally add the next concept needed, which is perfect for the young beginning piano student.  

Both books start with the proper technique with knees at the edge of the keys, sitting tall, and letting the fingers relax to form a rainbow shape. 

COLOR IT!

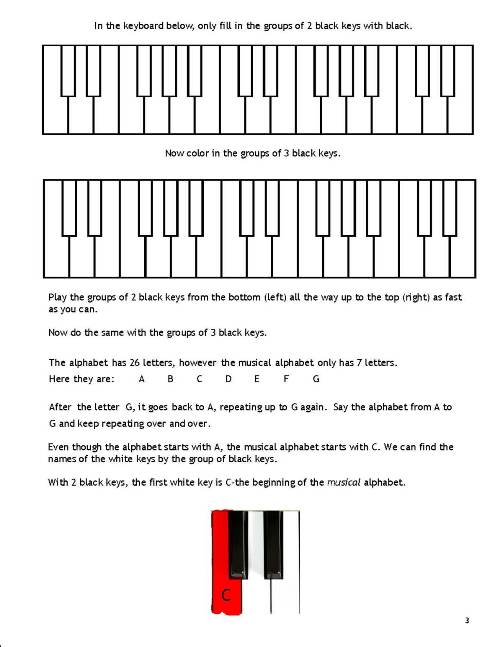
Keyboard geography is taught with a coloring book using the seven colors of the rainbow for the seven notes. It starts with coloring the sets of 2 black keys, then the 3 black keys, followed by just C-D-E in the first three colors of the rainbow.

SAY IT PLAY IT!

Children Songs by Letter Names
  • Songs to say and play, using letter names using the C-D-E.
  • Copycat games on C-D-E so the student can learn to listen and playback.
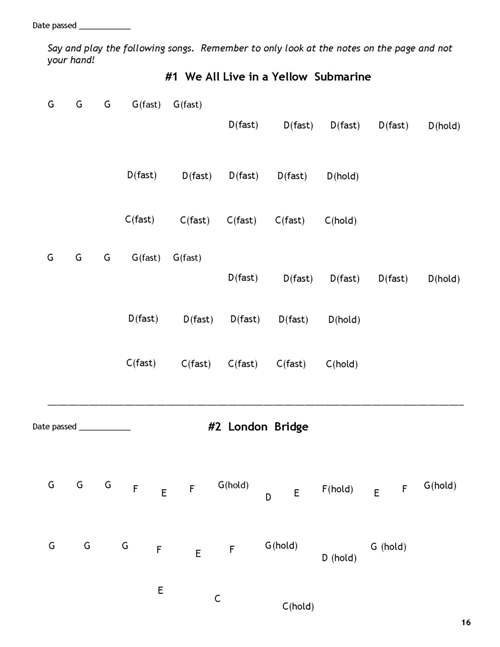
  • Familiar songs with letter names and words like fast and hold for the rhythm.

AND CREATE IT!

Children Writing Songs

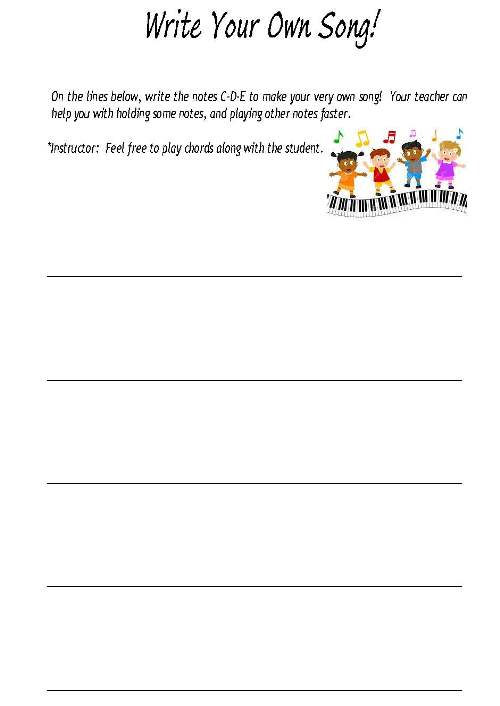
Then my favorite part, where the student does the “Write Your Own Song” using just the C-D-E notes in any order they want, can then play what they just created!

More Keyboard Geography!

Back to keyboard geography, coloring the F-G-A-B, then letter names for songs to practice all five notes. More copycat games follow with C-G.

Piano Exercises for children to learn piano

Children Piano Exercises

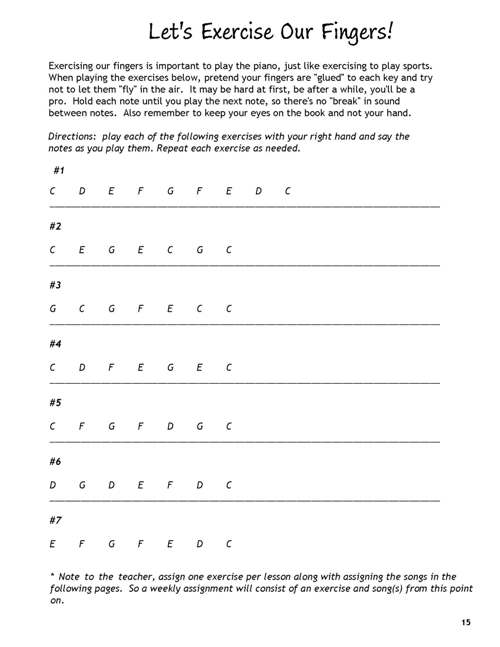
Then something is added that no other method book for this age has, EXERCISES! I believe even the young student needs to play exercises to develop their playing skill. These are patterns they can memorize and play multiple times to create control, steady beat, and speed! When students do not have to concentrate on the notes and rhythm, they can let their fingers fly on the keys.  

Then there are more familiar songs with letter names and fast and hold for the rhythm, and another “Write Your Own Song.”

Rhythm for children to learn piano

Rhythm Children Piano

Now rhythm is introduced, showing the value for the one, two, three, and four-count notes and rests (notice their names are not included). Worksheets follow for the student to fill out, then RHYTHM DRILLS, something not seen in any other method book for this age! I have found even a 4-year-old can play the rhythm drills and count aloud. Playing rhythm drills establishes fluency in reading, counting, and a steady beat. Then there is rhythm dictation, where the student listens and writes the rhythm they hear and a chance to create their own rhythm.  

Songs With Big Notes!

Once the rhythm is introduced, familiar songs are given using big notes with the name inside and rhythm for the young piano student to read notes and rhythm.

The left hand is introduced with fingering, songs, exercises, and copycat games to say and play using letter names. A page of rhythm drills is given, then left-hand songs with big notes and rhythm. These are original songs that are written how the left hand typically plays.

Both Hands Playing Songs!

Children Piano Songs

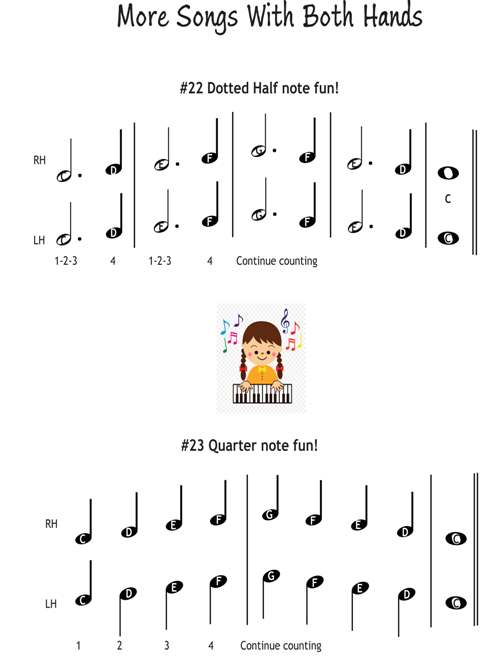
Then as you may guess, both hands are introduced with letter names to start and exercises. And finally, big notes with rhythm to play hands together. There are copy games for hands together that start with both hands playing the same note, then hands playing different notes. The book finishes with both hands playing familiar songs. Each song gets a little more challenging with a total of 33 songs.  

“Color It Say It Play It and Create It Too”

This book starts out recapping book 1 at an accelerated pace, so students ages 7 or 8 can begin with this book. After the student completes playing hands together with big notes and rhythm, it then introduces notation for the treble clef notes C-G, worksheets, and four songs. Then the bass cleft C-G notes are taught, worksheets, and four original songs for the left hand, written in the left-hand style. A rhythm drill is included reading both treble and bass clef lines. And finally, six songs with both hands, all original except the last song, “Ode to Joy.”  

The beginning of each book has assignment pages, note pages, and large manuscript pages for the student to write songs. The back of the book has a practice chart with points to give the student for passing assignments. And just for fun, there are Christmas songs at the back of both books. The student can play the arrangement for the level they’re in at Christmas time. 

By the end of book 2, the young student can play with skill and read fluently in the C position! They’re now ready to progress to our “Drill & Excel On the Piano” series!

I have seen my own young students learn when one concept is taught at a time. The “Color It Say It Play It and Create It” series offers the perfect step-by-step model for the young student to learn and thrive on the piano!

I hope this helps you be the best teacher ever!

Melody Music Publishers

Kathi Kerr founded Melody Music Studios in 1989, a nationwide music instruction studio. In 2017, she founded an independent publishing company called Melody Music Publishers for piano and singing method books. The learning model is small steps using drills and repetition, how students think and learn.

How Do Children Learn Piano? Read More »

Intermediate Piano student

Piano Method Books for Intermediate Students?

Are piano method books needed for the intermediate students? Most intermediate-level piano method books are merely repertoire for the student to play. But is there more for the intermediate student? Tip #9 are the information and skills the intermediate student should learn.  

What do beginning piano method books teach?

Beginning-level piano method books primarily teach keyboard geography, note reading, a little rhythm, diatonic intervals up to a 5th, and the I, ii, IV, and V7 triads. After finishing levels 3 or 4, most students can read music reasonably well and identify the intervals and the triads. However, there is more for the intermediate student to learn beyond just playing songs.

Watch our video

More for the beginning student?

First, let’s start with the beginning-level books. Here’s what you’ll find in “Drill & Excel On the Piano Book 1” from Melody Music Publishers that you won’t find in most beginning-level method books:

Drill & Excel Book 1
  • Rhythm Drills for the whole, half, dotted half, quarter notes, and the rests with multiple rhythm drills 
    1. “Rhythm is the most neglected part of most method books, even at the beginning level. Most piano method books only show the note’s value. However, simply knowing the value doesn’t create a sight-reading skill. Playing rhythm drills where the student plays and counts aloud (using a metronome) on one note is needed to read rhythm fluently”.
  • Theory 
    1. notes in order on the staff with multiple note reading worksheets
    2. C scale hands separate, then hands together for one octave, then multiple octaves (I have found even beginners are capable of playing scales in multiple octaves)
  •  Exercises
    1. multiple 5-note patterns (most instructors will add a book like Hannon for exercises; however, it uses a 6-note pattern, which can be difficult for a beginner)
    2. Staccato exercise – I’ve never seen this unique exercise in any method books, but it is an important skill to learn
    3. Independence of hands playing different dynamic levels and staccato/legato in each hand simultaneously using motor movement skills  
    4. Multiple notes exercise learning to play 2, 3, and 4 notes together.
    5. Dynamic exercise for learning control in playing with different volumes and velocity (firmness) of the key – This is another unique drill that is critical to learning to play with dynamics.
  • 60 original songs in the C position to create a sight-reading skill in this position

Easy to follow steps

After book 1, the first chapter reviews the previous books so that the intermediate student can start with books 2, 3, or 4 without missing essential information needed.  

The late beginner/early Intermediate Student

Here is what you’ll find in book 2 for the early intermediate student not found in most method books:

Drill & Excel On the Piano Book 2
  • Rhythm drills for the eighth note and rest, dotted quarter note (explaining the formula for the dot), the tie, and the 6/8 meter
  • Theory 
    1. G and D scales in multiple octaves
    2. remaining notes on the staff with multi worksheets
    3. diatonic intervals from 2nds through the octave with multiple worksheets for learning at sight (this helps in sight-reading)
    4. dynamic markings and musical symbols, including the pedal and a drill for how to use it
  • Exercises 
    1. intermediate level exercises played at a faster tempo 
    2. grace note exercise teaches how to play the grace notes with a quick and light touch
    3. diatonic interval drills using every finger combination – this unique drill teaches the student how to “feel” each interval with every possible fingering without looking and prepares the student to play songs outside the 5-note hand position
  •  60 original songs in the keys of the scales taught

The mid-intermediate Student

Here is what’s included for the mid intermediate student in “Drill & Excel On the Piano Book 3” not found in most method books:

Drill & Excel On the Piano Book 3
  • Rhythm drills for the sixteenth note and rest, dotted eighth, and the eighth, sixteenth, and quarter triplets
  • Theory
    1. major scales A and F in mulitple octaves 
    2. minor scales Am, Em, Bm, F#m, and Dm
    3. explanation of relative minor scales and accidentals
    4. chromatic scale
    5. whole and half steps
    6. chromatic intervals and how to name them
    7. the four kinds of triads
    8. three kinds of minor scales
    9. Picardy 3rd
    10. dissonance and resolution
    11. phrases
  • Exercises
    1. finger pedaling to learn how to hold one note while playing other notes simultaneously
    2. embellishment exercise needed when playing Baroque and classical style music
    3. left-hand drills show the typical left-hand movement to play without looking
    4. chromatic intervals with every finger combination – this repeats the previous diatonic intervals, except for playing the chromatic intervals, which completes EVERY finger combination when moving from one note to another
    5. chromatic scale
    6. consecutive 3rds – this is a challenging drill that is essential for playing intermediate and advanced level repertoire
    7. arpeggios – which are great as a drill and to learn all the triads’ inversions
    8. repeated notes and held notes while changing fingers – this is an essential skill to fingering
    9. left-hand bass jumps without looking – this skill is needed when the left-hand moves from bass note to chord
  • 60 original songs in the keys of the scales taught

Repertoire

Choosing a repertoire for the intermediate student has its challenges, whether using a method book or not. You want to make sure it’s the right level, not too challenging or too easy, and interesting for the student. Using the “Drill & Excel On the Piano” series is easy because the songs are specifically written for the chapter’s level, skill, and information taught. No more wondering if the repertoire is the right fit for the intermediate student. And the songs are written in various styles, giving the student exposure to them, from classical, pop, ragtime, jazz, and folk styles. When the student plays songs using what they’ve just learned, it creates deeper learning and understanding.

Late Intermediate Student

And finally, for the late intermediate student in “Drill & Excel On the Piano Book 4”, here is what you’ll find:  

Drill & Excel On the Piano Book 4
  •  Rhythm – odd meters and counting the 6/8, 9/8, and 12/8 in big beats, triplets with 2 against 3 and 3 against 4
  • Theory
    1. Scales B flat, E flat, G minor, and C minor
    2. triad numbers for major and minor keys
    3. improvisational tools
    4. music terminology
    5. circle of 5ths
    6. adding the 7th, 2nd, sus 4th, and 6th to triads
    7. blues scale
    8. 7th chords up the scale.
  • Exercises
    1. working on the 4th and 5th fingers, which are the weaker fingers
    2. playing multiple notes while holding a note (a great skill needed for intermediate and advanced repertoire)
    3. independence of fingers when you want one or more notes played louder than the others within one hand
    4. thumb exercise
    5. dominant 7th arpeggios, which is another arpeggio exercise for both skill and learning the dominant 7th chords around the circle of 5ths
  •  60 original songs in the keys of the scales taught

Go to the next level!

Everything is taught in an organized, step-by-step way that anyone can learn. Finally, there are piano method books for intermediate students that will help them excel to the next level!

I hope this tip makes you the BEST music teacher ever!

Kathi Kerr founded Melody Music Studios in 1989, a nationwide music instruction studio. In 2017, she founded an independent publishing company called Melody Music Publishers for piano and singing method books. The learning model is small steps using drills and repetition, how students think and learn.

Piano Method Books for Intermediate Students? Read More »

Performance Practice

How To Do a Performance Practice!

You spend hours practicing a piece to get ready for a performance. But is there a difference in practicing in the final stages? The answer is YES! Tip #8 is part three of my practicing series on how to do a performance practice!

Before the Performance

Tip #4 was how to practice, namely spot practicing troubled areas. However, there is a different strategy for practicing in the final weeks and days before a performance.  

I used to think once I had worked through all the troubled areas in a piece, I was ready to perform it. However, after several poor performances, I realized that knowing the piece didn’t necessarily mean my performance would be flawless. Indeed, the better you practice and work through all the troubled spots, the better your performance, but other factors also play into it. Here are practice strategies in the final stages before a performance that will help keep your performance smooth. These are things I wish I would have known this in my early years of performing.

#1 Record yourself and listen with a critical ear

After fixing the troubled spots, record yourself. There’s a vast difference between listening while playing and listening to a recording of your playing, where you can listen with a critical ear. As you’re listening, circle areas that you may need to go back and spot practice.  

#2 Play the piece without stopping as in performing

Once a piece is learned, and troubled spots fixed, play the piece without stopping as though you’re performing it. Play THROUGH the mistakes, and resist the urge to stop and fix them. As the saying goes, never stop while performing, so you should practice it this way. As you play, imagine an audience is listening to you. The more times you play a piece through without stops, the more confident you’ll be when performing, and the more confident you are, the better you’ll perform!

#3 Play the pice “cold” for a performance practice

The final step to preparing for a performance is how you play the piece “cold,” how you play before warming up. Playing this way is how you will be performing it, so it’s good to practice it this way. It’s also a true test for how well you know the piece. If you still have troubled areas, return to spot practicing.  

During the Performance

#4 What you think about while performing matters!

Performance Psychology

When we learn a new skill, we use the frontal part of our brain, which means we cannot have any other thoughts while doing the task. Remember learning to tie your shoes or driving? You probably couldn’t think about anything else until you had it mastered. Once we’ve mastered a skill, it then goes to the back part of our brain, where we do it without consciously thinking about it. Once you’ve learned a piece, it leaves your thoughts open during a performance, like the fact that people are watching you or not making mistakes. I’ve had performances where I began playing perfectly, but as soon as I thought, “Don’t make a mistake,” is when I DID make one.  

Train your thoughts to ONLY think about the music you’re playing and not care that people are watching you. Concentrate on how you’re enjoying playing, and you’ll give the performance of a lifetime!

I hope this tip makes you the BEST music teacher ever!

Kathi Kerr founded Melody Music Studios in 1989, a nationwide music instruction studio. In 2017, she founded an independent publishing company called Melody Music Publishers for piano and singing method books. The learning model is small steps using drills and repetition, how students think and learn.

How To Do a Performance Practice! Read More »

PianoTechnique

Bad Piano Techniques and How to Fix Them!

Tip #7 – Singing or playing an instrument requires proper technique.  Improper piano technique can prevent the pianist from attaining their potential and may cause injury. I will be highlighting bad piano techniques and how to fix them!

#1 Sitting Too Close and Too Low

Most pianists, even professional pianists, often sit too close and too low to the piano. Sitting this way causes the hand, wrist, and arm to be in an incorrect position, possibly causing pain and tiredness after prolonged playing.

Correct Piano Technique: Knees at Edge of Keys 

Your knees should be aligned with the edge of the keys and your elbows in front and not beside your body. For the height, your waist should be level with the keys. For children, have them sit on something (a phone book is perfect for this). The wrist should be flat, not lowered, making your hand, wrist, and arm level. Having a low wrist puts pressure on it and makes the fingers do all the work, causing them to tire quickly. A lowered wrist may also cause carpal tunnel, pain, and numbness in the fingers. Sit tall (don’t slouch) at the front edge of the bench, which gives you a forward angle that helps when needing to play with force, using gravity to assist in playing. Sitting on the edge of the bench doesn’t apply to children if their feet cannot touch the floor.

#2 Fingers too Flat or Too Curved

One bad piano technique I’ve seen is the wrong positioning of the fingers, from being too flat to having too much of a curve. Some method books describe the position of the fingers as though you’re holding a ball. The problem with this concept is the fingers will be naturally tense.   

Correct Piano Technique: Relaxed and Rounded Fingers

Your fingers should be as relaxed as possible. For a beginner, relaxing is not the easiest way to play, but it gets easier with skill. The simplest way to having a correct finger position is to place them palms up on your lap and let your fingers relax. That is the EXACT way to hold them on the piano. Imagine the rainbow curve, which is the exact curve needed. Play using the pads of the fingertips, not above the first joint (too low) or the part just below the fingernail (too high). Also, keep the first joint from bending. Unfortunately, pianists can never have long fingernails; otherwise, it will hinder playing at the correct part of the fingertip. 

#3 Moving Hands and Arms Too Much

If you’ve ever watched someone playing piano on TV (which we know they’re not really playing), they will usually move their hands and arms way too much. Moving unnecessarily may cause you to play incorrect notes, especially when playing quickly, and tire more easily. Moving the hand up and down is never needed. A technique called “rolling the wrist,” is where the wrist is lowered for stressed notes and raised for lighter notes. This kind of motion, in my view, is unnecessary and may make it difficult to play quickly and accurately.  

Correct Piano Technique: Little to No Movement

The goal of playing the piano is to keep your arms and hands as still and “quiet” as possible. The composer Mozart was known for placing a coin on the student’s hand while playing, with the goal to keep it from falling off. I’ve had fun doing this with my students as well. The fingertips should be “glued” to the keys, only going down and using the weight of the fingers to play the keys.  

With that said, there are some movements that help when playing. One movement is pivoting left or right towards the notes you’re about to play. Another is positioning the hand towards the back of the piano to accommodate the black keys, especially when the shorter fingers (the thumb and pinky) play the black keys and longer fingers play the white keys. And finally, another movement that is an exception to the fingers staying glued to the keys is raising the entire hand for staccato and accented notes or playing loudly. Raising the hand to play the keys gives momentum and strength.  

Good Piano Technique is Critical!

Having good piano technique helps the pianist play the very best. It also helps with the physical aspect of playing the piano to prevent tiredness and pain. You, the piano instructor, can help your piano students play well, not despite their technique, but because of it.

I hope this tip helps you be the best piano teacher EVER!

Melody Music Publishers

Kathi Kerr founded Melody Music Studios in 1989, a nationwide music instruction studio. In 2017, she founded an independent publishing company called Melody Music Publishers for piano and singing method books. The learning model is small steps using drills and repetition, how students think and learn.

Bad Piano Techniques and How to Fix Them! Read More »