play piano

PianoTechnique

Bad Piano Techniques and How to Fix Them!

Tip #7 – Singing or playing an instrument requires proper technique.  Improper piano technique can prevent the pianist from attaining their potential and may cause injury. I will be highlighting bad piano techniques and how to fix them!

#1 Sitting Too Close and Too Low

Most pianists, even professional pianists, often sit too close and too low to the piano. Sitting this way causes the hand, wrist, and arm to be in an incorrect position, possibly causing pain and tiredness after prolonged playing.

Correct Piano Technique: Knees at Edge of Keys 

Your knees should be aligned with the edge of the keys and your elbows in front and not beside your body. For the height, your waist should be level with the keys. For children, have them sit on something (a phone book is perfect for this). The wrist should be flat, not lowered, making your hand, wrist, and arm level. Having a low wrist puts pressure on it and makes the fingers do all the work, causing them to tire quickly. A lowered wrist may also cause carpal tunnel, pain, and numbness in the fingers. Sit tall (don’t slouch) at the front edge of the bench, which gives you a forward angle that helps when needing to play with force, using gravity to assist in playing. Sitting on the edge of the bench doesn’t apply to children if their feet cannot touch the floor.

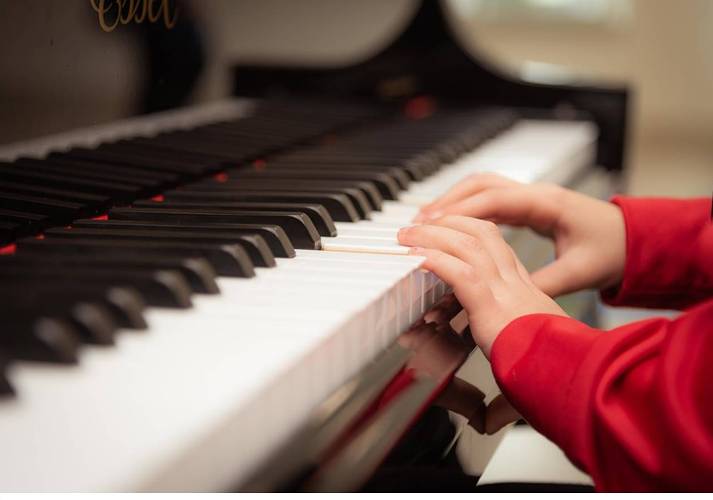
#2 Fingers too Flat or Too Curved

One bad piano technique I’ve seen is the wrong positioning of the fingers, from being too flat to having too much of a curve. Some method books describe the position of the fingers as though you’re holding a ball. The problem with this concept is the fingers will be naturally tense.   

Correct Piano Technique: Relaxed and Rounded Fingers

Your fingers should be as relaxed as possible. For a beginner, relaxing is not the easiest way to play, but it gets easier with skill. The simplest way to having a correct finger position is to place them palms up on your lap and let your fingers relax. That is the EXACT way to hold them on the piano. Imagine the rainbow curve, which is the exact curve needed. Play using the pads of the fingertips, not above the first joint (too low) or the part just below the fingernail (too high). Also, keep the first joint from bending. Unfortunately, pianists can never have long fingernails; otherwise, it will hinder playing at the correct part of the fingertip. 

#3 Moving Hands and Arms Too Much

If you’ve ever watched someone playing piano on TV (which we know they’re not really playing), they will usually move their hands and arms way too much. Moving unnecessarily may cause you to play incorrect notes, especially when playing quickly, and tire more easily. Moving the hand up and down is never needed. A technique called “rolling the wrist,” is where the wrist is lowered for stressed notes and raised for lighter notes. This kind of motion, in my view, is unnecessary and may make it difficult to play quickly and accurately.  

Correct Piano Technique: Little to No Movement

The goal of playing the piano is to keep your arms and hands as still and “quiet” as possible. The composer Mozart was known for placing a coin on the student’s hand while playing, with the goal to keep it from falling off. I’ve had fun doing this with my students as well. The fingertips should be “glued” to the keys, only going down and using the weight of the fingers to play the keys.  

With that said, there are some movements that help when playing. One movement is pivoting left or right towards the notes you’re about to play. Another is positioning the hand towards the back of the piano to accommodate the black keys, especially when the shorter fingers (the thumb and pinky) play the black keys and longer fingers play the white keys. And finally, another movement that is an exception to the fingers staying glued to the keys is raising the entire hand for staccato and accented notes or playing loudly. Raising the hand to play the keys gives momentum and strength.  

Good Piano Technique is Critical!

Having good piano technique helps the pianist play the very best. It also helps with the physical aspect of playing the piano to prevent tiredness and pain. You, the piano instructor, can help your piano students play well, not despite their technique, but because of it.

I hope this tip helps you be the best piano teacher EVER!

Melody Music Publishers

Kathi Kerr founded Melody Music Studios in 1989, a nationwide music instruction studio. In 2017, she founded an independent publishing company called Melody Music Publishers for piano and singing method books. The learning model is small steps using drills and repetition, how students think and learn.

Bad Piano Techniques and How to Fix Them! Read More »

Piano Method Books

Best Piano Method for Beginners?

There are as many different piano methods and approaches to teaching piano as there are vehicles. Each method has their own way of teaching. That’s actually good, because everyone learns in their own way. The experts have defined learning into seven categories: 1) Visual (Spatial or “watching”) 2) Aural (Listening) 3) Verbal (speaking) 4) Physical (Kinesthetic, or by “doing”) 5) Logical (Mathematical) 6) Social (Interpersonal or learning in a group setting) and 7) Solitary (Intrapersonal or learning on your own).

How To Choose the Method

Deciding “how” to teach a beginning piano student (or any instrument), can be more challenging than an intermediate student that has already developed a skill and a strong foundation. So how do we know what piano method will be best for each student? It starts with 2 things: 1) being familiar with each method, and 2) knowing how each student learns. In teaching over 30 years, I’ve enjoyed picking the student’s brains and figuring out how he or she learns. One thing I’ve found ALL students have in common; learning to play an instrument is HARD! Even students that have a natural musical talent is going to struggle when first learning. This is the primary reason, I believe, students quit lessons while in the beginning level.

Quick Summary for Method Books

The most well-known and popular methods are the piano method books. There’s probably 10 or more commonly used books. Most method books teach a little note reading, some theory (mostly intervals, I-IV-V-I triads, and Alberti bass), some may include a few exercises, and they all include multiple songs. Most will have several kinds of books within each level, so the student may have 3-4 books at a time. What they all have in common is there is almost nothing mentioned of rhythm, and they have a fairly fast progression. Early in my teaching, I realized they didn’t offer enough repetition in note reading and rhythm to create a fluency in reading music. So I wrote a “Note Reading Workbook” and “Rhythm Workbook” to supplement the method books. This seemed to help, but I found students were still frustrated in learning from the traditional method books.

Suzuki Method

There are also certified methods. Suzuki Method uses the “watch and copy” approach, the #1 style of learning mentioned earlier. This is great for young children who may not have the ability to learn by the other learning styles, which involve more maturity. It creates a quick way for young students to play songs. I think of this type of learning as superficial, since a student may not understand what they’re playing. In my view, it may be great to start a young student with this method, but not a permanent teaching method as the student gets older.

Orff Method and Kindermusik

The Orff Method exposes young students to music and is best used in a group setting. It combines music, movement, drama, and speech into lessons that are similar with how children play. KinderMusik is a group program for the child and adult, based on these principles. They start as young as infancy through 7 or 8.

Dalcroze Method

The Dalcroze Method features interactive games and exercises that help students learn to trust their ideas and develop their own intuitions. While these methods are great to expose the young student to music, it doesn’t teach the skill of playing a specific instrument. However, these methods may be useful to integrate in the lessons. These methods (other than Suzuki) may be best for the kinesthetic or “physical” type of learner, #4 of the learning styles mentioned above.

Quick and On Line Piano Methods

Then there’s the ever growing “learn to play 3 songs in 3 weeks” type of methods. These methods don’t offer a deep understanding on the piano, but is more of a “quickie” on playing chords and simple melodies. This is actually fine for older students that want to learn to play their favorite song without hours of learning to read music. However, it’s not a serious way to study and learn the piano. There’s also programs that offer a subscription package to learn on the computer. I believe they can be useful, but students that may be excited at first, may drift off when it gets difficult with no one there to guide them. They also do not include a lot of needed information for the student, or watch how the student is playing. This is similar to learning from a video on Youtube, where the student is not being guided by an instructor that can watch him or her play.

Small Steps Using Drills & Repetition

I mentioned earlier that I had written supplemental workbooks to help the student learn to read notes and rhythm. In 2017, I decided to write my own line of piano method books to include everything needed in one book. I also wanted it to have more information and more songs within each level to create a fluency in reading. My approach can be summarized into these words “small steps using drills and repetition”. While these words may not sound “fun”, I have found students enjoy playing when they’re able to master each step. What causes frustration is not understanding and moving too quickly. By taking small steps and using repetition, the student actually ENJOYS reading and playing the piano.

Drill & Excel On the Piano

Piano Method Series “Drill & Excel On the Piano”

This piano method book series is called “Drill & Excel On the Piano”. There are 4 books in this series with 3 chapters each and over 100 pages. Each book takes about a year to complete. Books 1 & 2 have have 7 parts to each chapter: 1) Note Reading and interval worksheets 2) Rhythm drills 3) Scales 4) Exercises 5) Special exercises for specific skills needed 6) 20 original songs per chapter, and 7) Write your own song. The “write your own song” page not only promotes creativity, but a deeper learning. Books 3 & 4 have 6 parts: 1) Interval worksheets 2) Rhythm drills 3) Scales 4) Exercises 5) Special exercises and 6) 20 original songs per chapter.

Why Original Songs?

Why did I write the songs? Most method books boast their books have familiar songs the student will enjoy playing. The problem with that is how do you (as the teacher) know if the student is reading the notes or playing by ear? Since all songs are original in “Drill & Excel On the Piano”, the student will have to read them and not rely on being familiar. Also the songs are written to teach what is taught in the chapter, as well as being fun to play. Books 3 and 4 include a variety of different styles, from classical, samba, boogie, pop, jazz, to rag time. When a student can read music on their own fluently, it makes it FUN to read and play songs. No more needing to have someone play it for them.

Piano and Singing Method Books Coming Soon

Coming soon is “Drill & Excel in Sight Singing”! If you’re a vocal instructor or vocal coach, this will help you teach the art of sight singing so the student can read and SING the notes without them being played. This is great for singing in a choir or the harmony parts as well as classical music. And book 5 of the “Drill & Excel On the Piano” will be available by the end of 2020. This will be for the early advanced student.

Teachers Receive Free Shipping and Discounts

If you register as a teacher, you’ll receive free shipping and the first copy of each book at 50% off!. You’ll also be notified of new books coming out, with a 50% discount for each new book. If you order for your students, you’ll receive free shipping and 20% off. This discount never expires and can be used with each order. It’s my way of thanking you for using my books, and for doing the best job in the world, sharing your passion of music to others!

Kathi Kerr - owner Melody Music Publishers
Kathi Kerr founded Melody Music Studios in 1989, a nationwide music instruction studio. She also founded Melody Music Publishers in 2017, an independent piano method books written how students think and learn.

Best Piano Method for Beginners? Read More »