piano

Music Student Long-Term

Keep Music Students Long-Term

One of the biggest challenges for a private music teacher is keeping students long-term. So what are the tricks to keeping a student from quitting? Here are 9 tips to help students take music lessons long-term.

When students quit soon after signing up, building a roster of students is difficult, making it a challenge to make a living. There will be those students whose’s destiny is to sing or play an instrument. So no matter how you teach them, they will be long-term. Then there are the students who not only dislike music lessons, they don’t even like the sound of music. And no matter what you do right, they will not stay with you long. 

Long-term piano student

So let’s talk about the middle-range music students that most fall into, those that have some desire to learn to sing or play an instrument. By teaching them correctly, you could potentially have a student for years. 

Have a passion for teaching music

Don’t be a music teacher just to make money when your performances are rare. Or think you can be a music teacher because you know how to play a few songs. There’s much more to becoming a music instructor than you may realize. You must have a passion for teaching and excitement when students learn, or it will become drudgery. If your students feel you’re not enjoying teaching, they won’t enjoy learning from you.

Get to know your students

If you’re still reading this post, I’m assuming you LOVE to teach music (as I do). The first critical factor in teaching is getting to know your students; study them. The great thing about teaching private lessons is how each student is unique. Figure out what makes them tick, their strengths, and their weaknesses. What do they love to do outside of music? Are they a perfectionist (the most challenging type of student to teach)? Are they analytical, mathematical-minded, or do they love to create? How do they learn best? Is it by listening, reading, doing, or watching? Knowing their personality, learning style, and what they love to do helps you match what you’re teaching to how they learn. It also makes the music student feel you know them and will be more endeared to you as a teacher. Who doesn’t want someone to know them well?

Be fun and friendly

When I first began teaching, I thought making lessons fun was an obvious point, but I quickly learned that not all instructors do this. I laugh and occasionally joke with my students while maintaining control and keeping on point during the music lesson. When the music student makes a mistake, I make it light. The less tension the student feels, the better they’ll do. And I never get mad or frustrated when a student makes mistakes. That’s part of the process, and the student should know you’ll never get upset at them. I tell my students that making a mistake can be a good thing, as they learn twice a much! Let the music student know it’s OK to make a mistake; and that, in fact, they likely will. 

Teach in small steps 

If you want to have a student running for the hills after one lesson, overwhelm them! I tell my staff to make the first lesson simple for a beginner, with one nugget of information they can learn. If the student is a quick learner, you’ll know by the second lesson, and you can increase the pace. But if the student leaves confused and frustrated, they’ll blame it on themselves for not understanding and will probably quit. Teach in a clear step-by-step method with plenty of repetition from the beginning and throughout your time with them. Be excited about any little achievement they make. Even small achievements can make a student excited and want to continue learning. Ask your students questions to ensure they understand every new concept you teach. Don’t assume they know what you’re talking about. I ask my students way more questions than they ask me in a lesson. 

Don’t guilt them into practice

This is one of the most critical points. I wrote a blog earlier on how to motivate your student to practice. I encourage you to read it. Practicing is one of the biggest challenges for a private music teacher. But one thing I know DOESN’T work is guilting your student into practicing. Making them feel bad when they haven’t practiced will only make them hate the lessons. Adult students already feel bad, so they’ll probably just quit. A child without parents who make them stick with it will probably quit. When a student doesn’t practice, I tell them it’s OK and try to practice more the following week. Nothing can be done about the previous week anyway, so why make them feel bad about it. Have them focus on the future instead of the past.

Sometimes it’s a legitimate reason they couldn’t practice, but if it’s a weekly occurrence, you may want to find out why they’re not practicing. One reason could be not understanding the assignments, as in the previous point. If you don’t give specific assignments, they may not know WHAT to practice. So make sure you give clear instructions on what they should practice. Or maybe they have a busy schedule. I encourage students of any age to schedule their practice times so it becomes routine in their life. Whatever you do, make practicing a positive thing in their life. And never say, “You’re wasting my time and your parents’ money” to a young student. Even if they don’t practice or seem to enjoy the lessons, what you’re teaching them will stay with them forever. You never know what your lessons will inspire the young student in their life.

Learning Progress

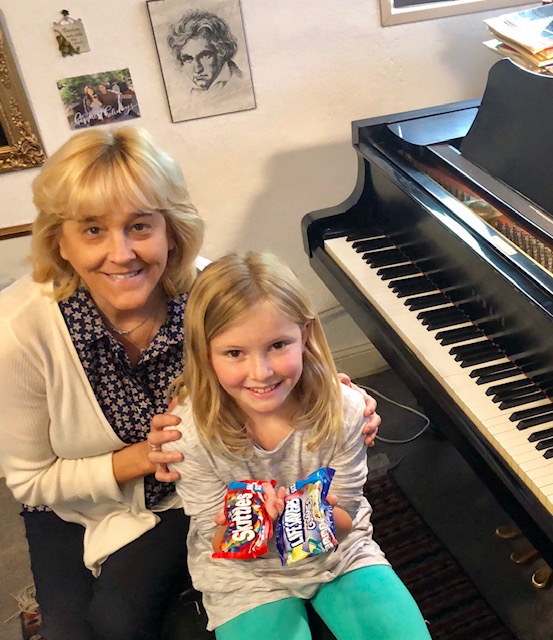
My students know I won’t pass an assignment unless they’ve done it correctly. This encourages them to do their best and practice, so I will pass it. If your student does a good job, let them know you’re happy with their accomplishments. If they didn’t meet your standards to pass, let them know to work on it another week without it being a brow-beating session. Keep in mind their limitations when passing or not passing. I will not be as critical of a beginner or slower-paced student as someone more advanced or a quick learner. It’s essential for the beginning student to feel a sense of accomplishment. 

Be prompt and consistent

One of the complaints I get from students that took lessons previously was their teacher would cancel a lot or be late. If you want music students long-term, you must be committed to their lesson time and be on time. Canceling a lesson should be rare and only for unavoidable circumstances. And if you do have to cancel, let them know as far in advance as possible. Showing your commitment to the lessons will likewise help the student be committed and have consistent attendance (which helps in their learning progress.) 

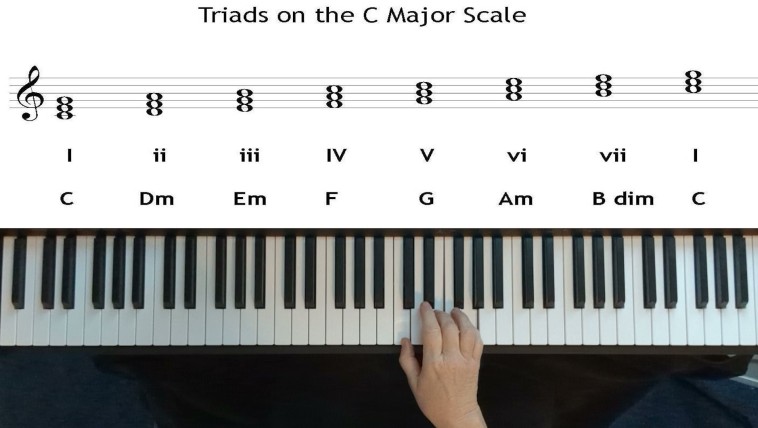
The Right Curriculum is Vital

Drill & Excel On the Piano

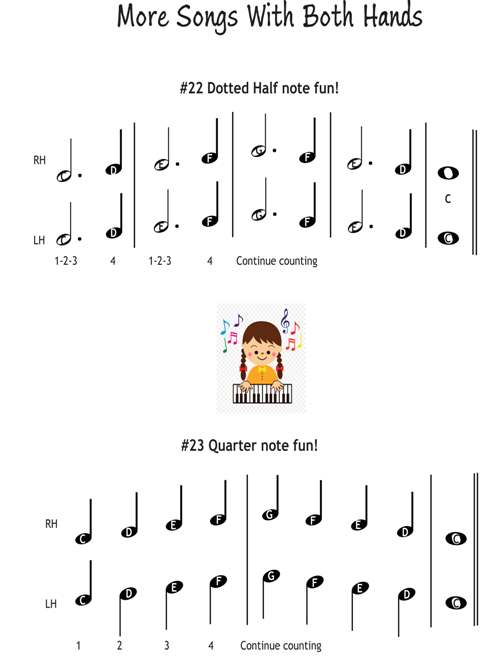
Having the right curriculum that teaches a step-by-step format is crucial. Use the book series that fits your teaching style and what is best for each student. 

Our “Drill & Excel On the Piano” series includes everything a piano student needs in an easy-to-follow step-by-step format, including plenty of repetition so the student can master each level. Teachers can register to receive free shipping and 50% off their first copy and 20% off recurring orders for students.

Remind them of their progress

And finally, remind them how much they’ve learned and how far they’ve come. This doesn’t have to be every week, or it will lose the effect, but do this when you feel the student needs a little assurance or when they’ve accomplished something challenging. I sometimes have the student play a previous assignment they thought was so difficult so they can see how far they’ve come. The most vital part of teaching beginning students to keep them long-term is making them feel good about their progress and accomplishments!

I hope this tip helps you be the best teacher ever. Thank you for doing the best job in the world and sharing your music with others. Please comment to let other private music teachers know your thoughts!

Kathi Kerr is the owner and founder of Melody Music Studios, a nationwide music teaching studio, and Melody Music Publishers.

Keep Music Students Long-Term Read More »

Musical Scales

Are Music Scales Needed?

Are music scales really needed? Does playing musical scales improve one’s musical ability? Why even play scales? Isn’t that something done in the past but no longer relevant in today’s music? Tip #11 will give you five reasons why musical scales ARE vital in today’s music.

Musical Scales
Musical Scale Youtube Video

What is a music scale?

Simply put, music scales are ascending notes in musical order, starting and ending on the same note with the sharps or flats for the starting note’s key signature. For example, the key signature of C has no sharps or flats. So when playing all the notes starting and ending on C, you will only play the white keys.

Playing scales on the piano or any instrument used to be the standard for learning. But in recent years, many music teachers have stopped teaching them, thinking they are outdated and boring. So why are the musical scales so necessary?

Key signatures – Reason #1

Music is played in a specific key signature, meaning a certain number of sharps or flats. Can’t remember what are in a specific key signature? The major scale has a sound most can identify. So if you’re not familiar with the correct sharps or flats needed, you can figure it out by playing the scale. I always teach scales by ear rather than reading notes or by the math formula (whole and half steps).

Scale Numbers – Reason #2

Musical scales help in ear training. Assigning a number for each of the seven notes 1 through 7 are called scale numbers. Each scale number has a unique sound. However, each specific scale number sounds the same in any key signature. For example, the “1” scale number, the “root,” sounds the same once your ear is acclimated to that key signature. The “1” is also the easiest to identify and the most prominent. The following most prominent scale number is the “5”, called the dominant (for a good reason, since it’s…dominant). The third most prominent scale number is the “3”. Then, like magic, if you play the “1-3-5” together, you have a major triad! Showing this to your students is a great way to introduce triads and chords. There are ways to help the student identify the sound for the other scale numbers, the “2”, “4”, “6”, and “7”. A fun assignment is to have the student listen to a simple melody, and identify the scale numbers. For example, “Mary Had a Little Lamb” starts out using the following scale numbers: “3-2-1-2-3-3-3-2-2-2-3-5-5”.  

Scale Numbers
Chord Numbers

Chord Numbers – Reason #3

We can build a triad (playing 1-3-5) on every scale number. This is called Scale Harmonization. For example, in the key of C, playing “C-E-G” builds the triad from the 1 scale number, which is the I chord. In traditional theory, roman numerals are used to identify the chord numbers. For example, I ii iii IV V vi and vii diminished. The great thing about the roman numerals is the upper and lower case identifies the major and minor triads. And just like each scale number has a unique sound, so do the triad or chord numbers. Once you learn how each triad number sounds, you can identify the chord number when listening to a song! This can be done on both the major and minor triads.

Identifying Accidentals – Reason #4

Accidentals or chromatic notes are commonly used in music, meaning notes and chords, not in the song’s key signature. Without accidentals, music would be dull. So if your ear is trained to hearing scale and chord numbers in the musical scale, an accidental will stick out like a sore thumb. Figuring out the scale and chord number for the accidental makes more sense when the student is familiar with the diatonic notesmeaning the scale and chord numbers that occur in the scale.  

Exercises – Reason #5

Using the scales as an exercise is a great way to start your practice. I play scales in multiple octaves many times before a serious practice and teach my students to do that as well. Playing scales build finger dexterity, control, strength, and speed on the piano or any instrument.

But how can the music teacher make music scales fun?

Piano Scales
Piano Scales

I agree that teaching the music scales can be boring at times. That is why I wrote the “Scales on Fire!” series. Each major and minor scale is taught in a short, fun song, using rhythm and harmonies on the scale. The sheet music can be downloaded at MelodyMusicPublishers.com for all the major and minor scales for sharped and flatted keys, or each major and minor scale individually. There’s also a video showing myself playing each of them. Now you can teach your students each major and minor scale in a fun and exciting way!

Melody Music Publishers
  • Kathi Kerr founded Melody Music Studios in 1989, a nationwide music instruction studio. In 2017, she founded an independent publishing company called Melody Music Publishers for piano and singing method books. The learning model is small steps using drills and repetition, how students think and learn.

Are Music Scales Needed? Read More »

Piano teacher and student

How Do Children Learn Piano?

How do young children learn to play the piano? Playing the piano and reading the notes simultaneously requires multiple skills that may be challenging for students under seven. Tip #10 is the best way to teach a young beginning piano student.  

Learning to play the piano requires learning the key names, playing them, and reading music, all at the same time. Learning all these skills simultaneously may be unrealistic for a child under seven. It may cause the student frustration and quit even before they’ve begun. 

Children Learn Piano
https://youtu.be/CGHzAYKk3DQ
Children Learn Piano

There are many piano method books for young students that offer different approaches. 

  •  There is a method called “rote learning,” a “copycat” type of learning. The teacher will play specific notes, and the student will play back what they’ve heard. There is some value in learning this way since a child at this age has learned everything by watching and copying. And it helps them to play songs right away, which keeps their interest. However, I don’t consider this a long-term teaching technique since they may not understand what they’re playing. It also doesn’t teach reading skills.
  • Another method is learning the notes by pattern numbers. However, this is also not effective long-term since most songs are not written out in pattern numbers.
  • Some method books use animal characters to teach fun activities that may not directly help teach the student to play. Even though it’s fun for the student, I feel this is a waste if too much time is spent on these activities.  
  •  Some books start with playing the black keys only with finger numbers. Playing this way doesn’t teach the key name and is not realistic to playing the piano.
  • Some books start with the middle C hand positions, where both thumbs awkwardly share middle C, then skip to other hand positions before the student has the chance to master each one.
  • Another method book offers colors for each key to play songs instead of the key name. In my view, this is an example of another waste of time and learning, since this is not used in reading music.

Children Piano Book
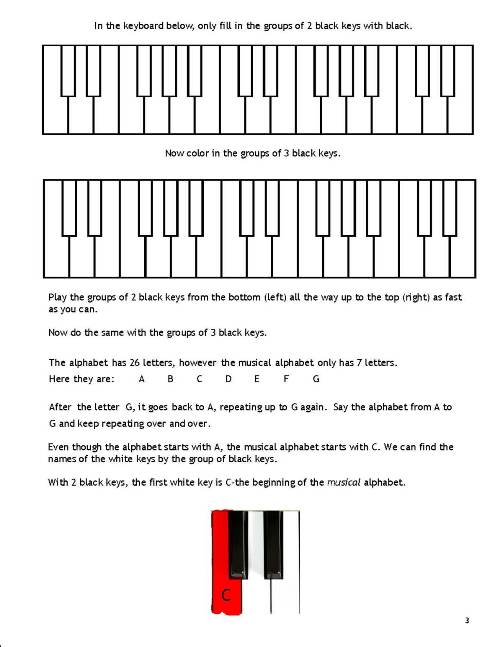
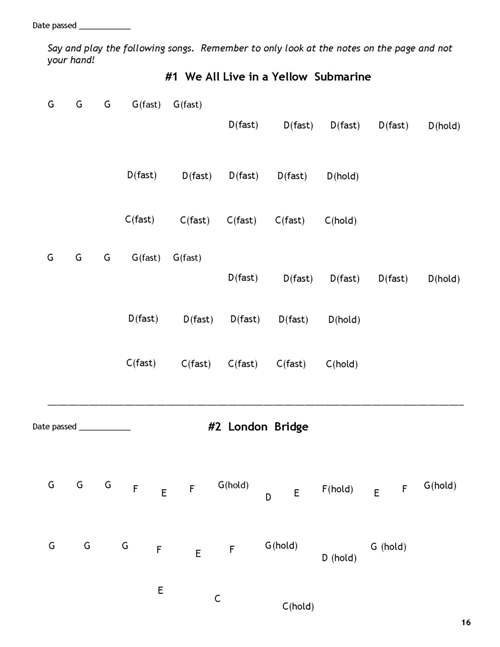
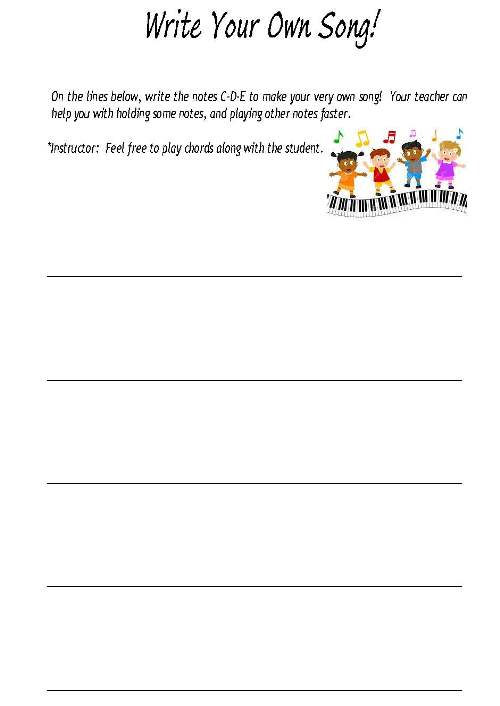
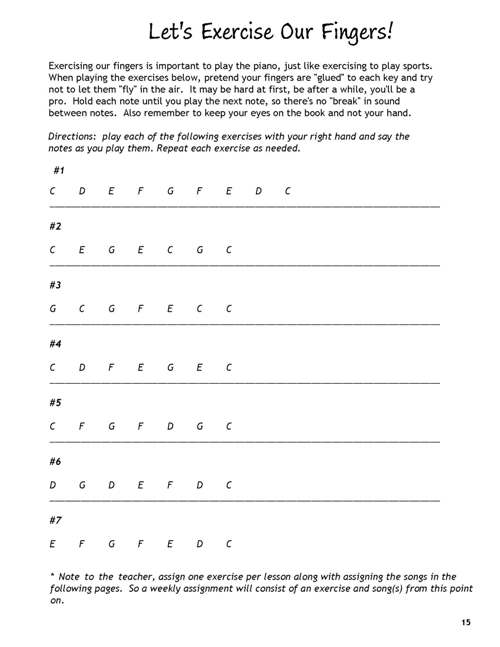
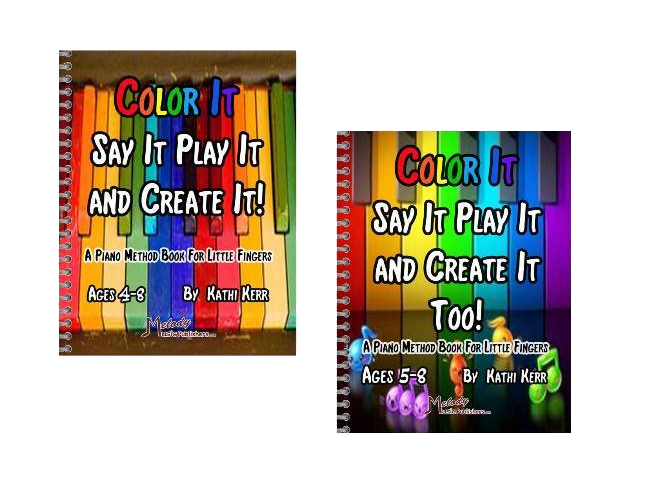
At Melody Music Publishers, we have two books for ages 4-8 called “Color It Say It Play it and Create It,” a 60-page book, and Color It Say It Play It and Create It Too”, a 50-page book. They’re taught for children to learn piano with clear steps that start with one concept and incrementally add the next concept needed, which is perfect for the young beginning piano student.  

Both books start with the proper technique with knees at the edge of the keys, sitting tall, and letting the fingers relax to form a rainbow shape. 

COLOR IT!

Keyboard geography is taught with a coloring book using the seven colors of the rainbow for the seven notes. It starts with coloring the sets of 2 black keys, then the 3 black keys, followed by just C-D-E in the first three colors of the rainbow.

SAY IT PLAY IT!

Children Songs by Letter Names
  • Songs to say and play, using letter names using the C-D-E.
  • Copycat games on C-D-E so the student can learn to listen and playback.
  • Familiar songs with letter names and words like fast and hold for the rhythm.

AND CREATE IT!

Children Writing Songs

Then my favorite part, where the student does the “Write Your Own Song” using just the C-D-E notes in any order they want, can then play what they just created!

More Keyboard Geography!

Back to keyboard geography, coloring the F-G-A-B, then letter names for songs to practice all five notes. More copycat games follow with C-G.

Piano Exercises for children to learn piano

Children Piano Exercises

Then something is added that no other method book for this age has, EXERCISES! I believe even the young student needs to play exercises to develop their playing skill. These are patterns they can memorize and play multiple times to create control, steady beat, and speed! When students do not have to concentrate on the notes and rhythm, they can let their fingers fly on the keys.  

Then there are more familiar songs with letter names and fast and hold for the rhythm, and another “Write Your Own Song.”

Rhythm for children to learn piano

Rhythm Children Piano

Now rhythm is introduced, showing the value for the one, two, three, and four-count notes and rests (notice their names are not included). Worksheets follow for the student to fill out, then RHYTHM DRILLS, something not seen in any other method book for this age! I have found even a 4-year-old can play the rhythm drills and count aloud. Playing rhythm drills establishes fluency in reading, counting, and a steady beat. Then there is rhythm dictation, where the student listens and writes the rhythm they hear and a chance to create their own rhythm.  

Songs With Big Notes!

Once the rhythm is introduced, familiar songs are given using big notes with the name inside and rhythm for the young piano student to read notes and rhythm.

The left hand is introduced with fingering, songs, exercises, and copycat games to say and play using letter names. A page of rhythm drills is given, then left-hand songs with big notes and rhythm. These are original songs that are written how the left hand typically plays.

Both Hands Playing Songs!

Children Piano Songs

Then as you may guess, both hands are introduced with letter names to start and exercises. And finally, big notes with rhythm to play hands together. There are copy games for hands together that start with both hands playing the same note, then hands playing different notes. The book finishes with both hands playing familiar songs. Each song gets a little more challenging with a total of 33 songs.  

“Color It Say It Play It and Create It Too”

This book starts out recapping book 1 at an accelerated pace, so students ages 7 or 8 can begin with this book. After the student completes playing hands together with big notes and rhythm, it then introduces notation for the treble clef notes C-G, worksheets, and four songs. Then the bass cleft C-G notes are taught, worksheets, and four original songs for the left hand, written in the left-hand style. A rhythm drill is included reading both treble and bass clef lines. And finally, six songs with both hands, all original except the last song, “Ode to Joy.”  

The beginning of each book has assignment pages, note pages, and large manuscript pages for the student to write songs. The back of the book has a practice chart with points to give the student for passing assignments. And just for fun, there are Christmas songs at the back of both books. The student can play the arrangement for the level they’re in at Christmas time. 

By the end of book 2, the young student can play with skill and read fluently in the C position! They’re now ready to progress to our “Drill & Excel On the Piano” series!

I have seen my own young students learn when one concept is taught at a time. The “Color It Say It Play It and Create It” series offers the perfect step-by-step model for the young student to learn and thrive on the piano!

I hope this helps you be the best teacher ever!

Melody Music Publishers

Kathi Kerr founded Melody Music Studios in 1989, a nationwide music instruction studio. In 2017, she founded an independent publishing company called Melody Music Publishers for piano and singing method books. The learning model is small steps using drills and repetition, how students think and learn.

How Do Children Learn Piano? Read More »

Intermediate Piano student

Piano Method Books for Intermediate Students?

Are piano method books needed for the intermediate students? Most intermediate-level piano method books are merely repertoire for the student to play. But is there more for the intermediate student? Tip #9 are the information and skills the intermediate student should learn.  

What do beginning piano method books teach?

Beginning-level piano method books primarily teach keyboard geography, note reading, a little rhythm, diatonic intervals up to a 5th, and the I, ii, IV, and V7 triads. After finishing levels 3 or 4, most students can read music reasonably well and identify the intervals and the triads. However, there is more for the intermediate student to learn beyond just playing songs.

Watch our video

More for the beginning student?

First, let’s start with the beginning-level books. Here’s what you’ll find in “Drill & Excel On the Piano Book 1” from Melody Music Publishers that you won’t find in most beginning-level method books:

Drill & Excel Book 1
  • Rhythm Drills for the whole, half, dotted half, quarter notes, and the rests with multiple rhythm drills 
    1. “Rhythm is the most neglected part of most method books, even at the beginning level. Most piano method books only show the note’s value. However, simply knowing the value doesn’t create a sight-reading skill. Playing rhythm drills where the student plays and counts aloud (using a metronome) on one note is needed to read rhythm fluently”.
  • Theory 
    1. notes in order on the staff with multiple note reading worksheets
    2. C scale hands separate, then hands together for one octave, then multiple octaves (I have found even beginners are capable of playing scales in multiple octaves)
  •  Exercises
    1. multiple 5-note patterns (most instructors will add a book like Hannon for exercises; however, it uses a 6-note pattern, which can be difficult for a beginner)
    2. Staccato exercise – I’ve never seen this unique exercise in any method books, but it is an important skill to learn
    3. Independence of hands playing different dynamic levels and staccato/legato in each hand simultaneously using motor movement skills  
    4. Multiple notes exercise learning to play 2, 3, and 4 notes together.
    5. Dynamic exercise for learning control in playing with different volumes and velocity (firmness) of the key – This is another unique drill that is critical to learning to play with dynamics.
  • 60 original songs in the C position to create a sight-reading skill in this position

Easy to follow steps

After book 1, the first chapter reviews the previous books so that the intermediate student can start with books 2, 3, or 4 without missing essential information needed.  

The late beginner/early Intermediate Student

Here is what you’ll find in book 2 for the early intermediate student not found in most method books:

Drill & Excel On the Piano Book 2
  • Rhythm drills for the eighth note and rest, dotted quarter note (explaining the formula for the dot), the tie, and the 6/8 meter
  • Theory 
    1. G and D scales in multiple octaves
    2. remaining notes on the staff with multi worksheets
    3. diatonic intervals from 2nds through the octave with multiple worksheets for learning at sight (this helps in sight-reading)
    4. dynamic markings and musical symbols, including the pedal and a drill for how to use it
  • Exercises 
    1. intermediate level exercises played at a faster tempo 
    2. grace note exercise teaches how to play the grace notes with a quick and light touch
    3. diatonic interval drills using every finger combination – this unique drill teaches the student how to “feel” each interval with every possible fingering without looking and prepares the student to play songs outside the 5-note hand position
  •  60 original songs in the keys of the scales taught

The mid-intermediate Student

Here is what’s included for the mid intermediate student in “Drill & Excel On the Piano Book 3” not found in most method books:

Drill & Excel On the Piano Book 3
  • Rhythm drills for the sixteenth note and rest, dotted eighth, and the eighth, sixteenth, and quarter triplets
  • Theory
    1. major scales A and F in mulitple octaves 
    2. minor scales Am, Em, Bm, F#m, and Dm
    3. explanation of relative minor scales and accidentals
    4. chromatic scale
    5. whole and half steps
    6. chromatic intervals and how to name them
    7. the four kinds of triads
    8. three kinds of minor scales
    9. Picardy 3rd
    10. dissonance and resolution
    11. phrases
  • Exercises
    1. finger pedaling to learn how to hold one note while playing other notes simultaneously
    2. embellishment exercise needed when playing Baroque and classical style music
    3. left-hand drills show the typical left-hand movement to play without looking
    4. chromatic intervals with every finger combination – this repeats the previous diatonic intervals, except for playing the chromatic intervals, which completes EVERY finger combination when moving from one note to another
    5. chromatic scale
    6. consecutive 3rds – this is a challenging drill that is essential for playing intermediate and advanced level repertoire
    7. arpeggios – which are great as a drill and to learn all the triads’ inversions
    8. repeated notes and held notes while changing fingers – this is an essential skill to fingering
    9. left-hand bass jumps without looking – this skill is needed when the left-hand moves from bass note to chord
  • 60 original songs in the keys of the scales taught

Repertoire

Choosing a repertoire for the intermediate student has its challenges, whether using a method book or not. You want to make sure it’s the right level, not too challenging or too easy, and interesting for the student. Using the “Drill & Excel On the Piano” series is easy because the songs are specifically written for the chapter’s level, skill, and information taught. No more wondering if the repertoire is the right fit for the intermediate student. And the songs are written in various styles, giving the student exposure to them, from classical, pop, ragtime, jazz, and folk styles. When the student plays songs using what they’ve just learned, it creates deeper learning and understanding.

Late Intermediate Student

And finally, for the late intermediate student in “Drill & Excel On the Piano Book 4”, here is what you’ll find:  

Drill & Excel On the Piano Book 4
  •  Rhythm – odd meters and counting the 6/8, 9/8, and 12/8 in big beats, triplets with 2 against 3 and 3 against 4
  • Theory
    1. Scales B flat, E flat, G minor, and C minor
    2. triad numbers for major and minor keys
    3. improvisational tools
    4. music terminology
    5. circle of 5ths
    6. adding the 7th, 2nd, sus 4th, and 6th to triads
    7. blues scale
    8. 7th chords up the scale.
  • Exercises
    1. working on the 4th and 5th fingers, which are the weaker fingers
    2. playing multiple notes while holding a note (a great skill needed for intermediate and advanced repertoire)
    3. independence of fingers when you want one or more notes played louder than the others within one hand
    4. thumb exercise
    5. dominant 7th arpeggios, which is another arpeggio exercise for both skill and learning the dominant 7th chords around the circle of 5ths
  •  60 original songs in the keys of the scales taught

Go to the next level!

Everything is taught in an organized, step-by-step way that anyone can learn. Finally, there are piano method books for intermediate students that will help them excel to the next level!

I hope this tip makes you the BEST music teacher ever!

Kathi Kerr founded Melody Music Studios in 1989, a nationwide music instruction studio. In 2017, she founded an independent publishing company called Melody Music Publishers for piano and singing method books. The learning model is small steps using drills and repetition, how students think and learn.

Piano Method Books for Intermediate Students? Read More »

PianoTechnique

Bad Piano Techniques and How to Fix Them!

Tip #7 – Singing or playing an instrument requires proper technique.  Improper piano technique can prevent the pianist from attaining their potential and may cause injury. I will be highlighting bad piano techniques and how to fix them!

#1 Sitting Too Close and Too Low

Most pianists, even professional pianists, often sit too close and too low to the piano. Sitting this way causes the hand, wrist, and arm to be in an incorrect position, possibly causing pain and tiredness after prolonged playing.

Correct Piano Technique: Knees at Edge of Keys 

Your knees should be aligned with the edge of the keys and your elbows in front and not beside your body. For the height, your waist should be level with the keys. For children, have them sit on something (a phone book is perfect for this). The wrist should be flat, not lowered, making your hand, wrist, and arm level. Having a low wrist puts pressure on it and makes the fingers do all the work, causing them to tire quickly. A lowered wrist may also cause carpal tunnel, pain, and numbness in the fingers. Sit tall (don’t slouch) at the front edge of the bench, which gives you a forward angle that helps when needing to play with force, using gravity to assist in playing. Sitting on the edge of the bench doesn’t apply to children if their feet cannot touch the floor.

#2 Fingers too Flat or Too Curved

One bad piano technique I’ve seen is the wrong positioning of the fingers, from being too flat to having too much of a curve. Some method books describe the position of the fingers as though you’re holding a ball. The problem with this concept is the fingers will be naturally tense.   

Correct Piano Technique: Relaxed and Rounded Fingers

Your fingers should be as relaxed as possible. For a beginner, relaxing is not the easiest way to play, but it gets easier with skill. The simplest way to having a correct finger position is to place them palms up on your lap and let your fingers relax. That is the EXACT way to hold them on the piano. Imagine the rainbow curve, which is the exact curve needed. Play using the pads of the fingertips, not above the first joint (too low) or the part just below the fingernail (too high). Also, keep the first joint from bending. Unfortunately, pianists can never have long fingernails; otherwise, it will hinder playing at the correct part of the fingertip. 

#3 Moving Hands and Arms Too Much

If you’ve ever watched someone playing piano on TV (which we know they’re not really playing), they will usually move their hands and arms way too much. Moving unnecessarily may cause you to play incorrect notes, especially when playing quickly, and tire more easily. Moving the hand up and down is never needed. A technique called “rolling the wrist,” is where the wrist is lowered for stressed notes and raised for lighter notes. This kind of motion, in my view, is unnecessary and may make it difficult to play quickly and accurately.  

Correct Piano Technique: Little to No Movement

The goal of playing the piano is to keep your arms and hands as still and “quiet” as possible. The composer Mozart was known for placing a coin on the student’s hand while playing, with the goal to keep it from falling off. I’ve had fun doing this with my students as well. The fingertips should be “glued” to the keys, only going down and using the weight of the fingers to play the keys.  

With that said, there are some movements that help when playing. One movement is pivoting left or right towards the notes you’re about to play. Another is positioning the hand towards the back of the piano to accommodate the black keys, especially when the shorter fingers (the thumb and pinky) play the black keys and longer fingers play the white keys. And finally, another movement that is an exception to the fingers staying glued to the keys is raising the entire hand for staccato and accented notes or playing loudly. Raising the hand to play the keys gives momentum and strength.  

Good Piano Technique is Critical!

Having good piano technique helps the pianist play the very best. It also helps with the physical aspect of playing the piano to prevent tiredness and pain. You, the piano instructor, can help your piano students play well, not despite their technique, but because of it.

I hope this tip helps you be the best piano teacher EVER!

Melody Music Publishers

Kathi Kerr founded Melody Music Studios in 1989, a nationwide music instruction studio. In 2017, she founded an independent publishing company called Melody Music Publishers for piano and singing method books. The learning model is small steps using drills and repetition, how students think and learn.

Bad Piano Techniques and How to Fix Them! Read More »

MusicTransferStudent

Teaching A Music Transfer Student!

Tip #6 – Teaching a music transfer student, someone that has taken lessons previously, is probably the most challenging of students for a music teacher. You don’t know what they know or, more importantly, what they don’t know, and they will compare you to the previous instructor. This tip will give you great insights into making a smooth transition for the transfer student and can apply to any instrument.

Be Prepared

Before the first lesson, ask the student or parent what curriculum they used or music they played with the previous instructor, as well as any notes the instructor had written. Take the time to read and become acquainted with the information they give you. Knowing their background will help you determine their skill level and style of the previous instructor. If possible, try and continue with their curriculum, especially at the beginning, to keep a smooth flow into your teaching.  

Establish a rapport with the music transfer student

The first lesson is the most critical and will set the tone. Start by getting to know the music transfer student and letting them get to know you. Spend a few minutes to let the student know your training background and experience. Then take a few minutes to ask the students questions about their past piano experience and what they are interested in learning. Knowing this will help you plan the best path for the lessons. It will also help the student be more comfortable and let them know you care about their interests and goals. 

The first lesson

Once you’ve made the student feel comfortable with you, have them play a piece that shows their highest level. Upon hearing them play, you can tell their strengths and weaknesses. Asking them specific questions about the piece they played is a good way to determine what they know and don’t know. 

Make Changes Slowly

You may be tempted to make multiple changes from the start, but be careful to present changes slowly and incrementally. They will need time to adjust to your teaching style and personality, and that alone may be overwhelming at the beginning. The most challenging changes are bad habits or wrong technique. Start with complementing the student on what they do well, then make changes one at a time. However, it is good to offer some information or changes in the first lesson to show them you can take them to the next level.  

Be Careful Commenting on the Previous Music Teacher

Whether the music transfer student had a positive or negative experience with the previous instructor, it’s essential to keep your comments at a minimum. Keep the focus on the direction between you and the student. Telling the student they were taught incorrectly may cause frustration and a sense of wasted time and money. It may also cause a division between you and the student. 

Not every student-teacher is a match for the music transfer student

Be realistic that you may not be the right instructor for all music transfer students since they may have specific interests you cannot fulfill. If that is the case, be honest with them. They will appreciate and respect you for your honesty. If you can, recommend another instructor who can teach their interests. If this happens, don’t be discouraged; there are plenty of other transfer students that will fit your teaching style and personality.  

It Gets Easier

While you may feel like you’ll be the “new” instructor forever, before long, you’ll be their new favorite! Just like any relationship, it takes time to establish. Be patient, and soon you’ll be the instructor they compare others to!

I hope this tip helps you be the BEST music teacher ever!

Melody Music Publishers

Kathi Kerr founded Melody Music Studios in 1989, a nationwide music instruction studio. In 2017, she founded an independent publishing company called Melody Music Publishers for piano and singing method books. The learning model is small steps using drills and repetition, how students think and learn.

Teaching A Music Transfer Student! Read More »

HOW to Practice a Song on the Piano

Tip #4

In my previous blog, I talked about how to motivate a student to practice. Now I want to talk about HOW to practice a song on the piano. Practice doesn’t always make perfect, but perfect practice makes perfect. The amount of time doesn’t automatically mean improving. A lot can be done in a short amount of time if practicing correctly. Practicing incorrectly may do more harm than help.  

What Practicing is NOT

Playing a song from beginning to end is not a practice; that’s called a PERFORMANCE! Here are ways to practice a new song.

First Step

The student should begin each practice with exercises and warm-ups. Doing this helps to get their mind and fingers ready. For a new piece, let your student play it from beginning to end, mistakes and all, to get acquainted with the song.

Spot Practice on the Piano

After playing through the song, it’s time to spot practice the more challenging parts. It may be a few notes, a measure, or an entire line. 

1. Play notes without rhythm

If the notes are the problem, play them without rhythm or steady beat. The student can start with hands separate, especially the hand that may give them the most trouble. If the notes jump around, have the student play them without looking to “feel” the notes’ distance.

2. Play rhythm without notes

If the rhythm is challenging, have the student play the rhythm on one note and count out loud. This way of playing is what I call a rhythm drill. The student can start with hands separate and then both hands to learn how the rhythm lines up.

3. Alignment Practice

If the student plays hands separately well but can’t play them together, I suggest alignment practice. Have the student play the notes with both hands VERY slowly, with no rhythm or steady beat. Notice where the notes line up in each hand and how it feels to play them together. When the student can play the notes together, play with the rhythm at a very slow tempo. And finally, increase the tempo incrementally until it’s at the desired tempo.

4. Repeat section immediately until learned.

When the student plays the troubled spot correctly, have them immediately repeat it until it’s solid. The sooner the student repeats the area when it’s still fresh in their mind, the better the retention. Once it’s learned, have the student practice a measure before and after several times to ensure it’s smooth going into and out of the troubled area. The gauge to having learned the troubled areas is how they play it cold at the next practice. If the student makes the same mistakes, they will need to repeat the spot practicing steps.

5. Record the student

It may be difficult for the student to listen to themselves while playing, so recording the piece is an excellent way to critique it. Listening to the recording is much different from listening while playing. The student may want to circle the parts they may still need work on and then go back to spot practicing those areas.

Now Play the Entire Piece

Once the student has untangled the challenging areas, they can now play the song from beginning to end. When the student has played the notes and rhythm correctly, this is an excellent time to focus on dynamics and phrasing.

6. Final Practice on the Piano

The last step to finalizing a piece is to play it without stopping. If the student is unable to, they may need to go back to spot practicing certain areas. If the student will be performing the piece, a week or so before performing, have them play the piece without stopping, even playing through errors. Being able to play it all the way through without stopping will give the student confidence when performing.

I hope this tip helps you to be the best music teacher ever!

Melody Music Publishers

Kathi Kerr founded Melody Music Studios in 1989, a nationwide music instruction studio. In 2017, she founded an independent publishing company called Melody Music Publishers for piano and singing method books. The learning model is small steps using drills and repetition, how students think and learn.

HOW to Practice a Song on the Piano Read More »

Choosing The Right Method Book Tip #1

The most important decision you’ll make when starting a new student is the right curriculum or method book. It will determine how they learn and how you teach!

Since most piano method books are merely a book of songs with little information, you, the instructor, may have to use multiple books, requiring you to explain everything. Not only does that make more work for you, but it can also be confusing for the student. This also requires the student to use and bring multiple books to the lessons.

What if there was one book that made teaching SO easy, you’re hardly teaching at all! That’s exactly what the “Drill & Excel On the Piano” method book series does!

Only one book Is needed! Each book includes everything a student needs, from written worksheets to learn the notes, intervals, triads, and chords, to rhythm drills, exercises, scales, and 60 original songs per book to help the student sight-read.

When I started using these books on my students, (I called them my guinea pigs), I noticed right away how they improved in their playing and sight-reading skill, even passing songs they played the first time.

I hope this tip helps in your teaching. Thank you for your dedication and passion to music education.

Please leave a comment to let other music teachers know what you think!

Kathi Kerr founded Melody Music Studios in 1989, a nationwide music instruction studio. In 2017, she founded an independent publishing company called Melody Music Publishers for piano and singing method books. The learning model is small steps using drills and repetition, how students think and learn.

Choosing The Right Method Book Tip #1 Read More »

Drill & Excel On the Piano

Piano Method Books That Make Teaching Easy!

Hey fellow piano teachers, what if there were piano method books that made your teaching job so easy, you feel you’re hardly working at all? That’s exactly what the “Drill & Excel On the Piano” book series does! Click any book to watch a movie where the author goes through each page with commentary. Most piano method books are songs with little information included. This means you have to explain in detail every new concept. And since piano method books don’t include every part of the lesson needed, you have to supplement books for teaching exercises, scales, theory, note naming, and rhythm games to improve their reading ability. Having multiple books also makes it challenging in the lesson for both you and the student.

Everything in one book

At Melody Music Publishers, the “Drill & Excel On the Piano” series has everything in one book. Each book is in 3 chapters and includes multiple note reading and interval worksheets, rhythm drills, exercises, and special exercises for specific skills, scales, and 20 original songs per chapter (totaling 60 songs per book)! Since the author, Kathi Kerr, writes the songs, a student has to read the notes and not rely on their ear to play. Most method books brag about having songs students are familiar with. However, if reading music fluently is the goal, a student can trick the piano teacher when playing a song if they rely on their ear instead of reading the notes.

Easy Steps to follow

Teaching from the “Drill & Excel On the Piano” series is nice because it lays out the information in an easy to follow step format. Without a book to guide the teacher and student, it’s easy to forget about important steps the student needs. However, with these books, the piano teacher can relax and know each critical step is included, taught straightforwardly with examples, drills, and exercises. The repetition given ensures the student fully understands each step before moving on to the next one.

Written Worksheets

Why are writing assignments so important? I believe writing the information is the first layer of understanding and retaining the information. When a student repeatedly writes the names of the notes or intervals, they’re more likely to retain the information. With the “Drill & Excel On the Piano” books, there are multiple worksheets to help students learn and remember notes. No acronyms are taught, like “Every Good Boy Does Fine.” Instead, the staff’s logic is shown, and five sets of notes are taught at a time with multiple worksheets per set of notes.

Rhythm Drills

Where’s the rhythm in most method books? Most piano method books may give the value of each kind of note, but nothing else. I have found rhythm is the most neglected part of piano method books and lessons. A student needs more than just shown each note’s value. To read rhythm fluently requires playing multiple rhythm drills. In “Drill & Excel On The PIano,” the note’s value is taught with multiple rhythm drills for the student to play. Playing them with a steady beat, and counting the beats out loud is recommended.

Exercises

As mentioned earlier, most piano instructors will use a separate book for exercises. However, many exercise books are not suitable for the beginning student when the pattern includes more than a five-note hand position. In “Drill & Excel On the Piano” books, the exercises correspond with the chapter’s songs and skills needed. For example, in chapter 1 of book 1, only five-note pattern exercises are given that go with the songs. As the hand position expands, the exercises do as well. There are also “special” exercises that go along with the skills needed for the songs. In book 1, chapter 3, an exercise to teach the skill of independence of hands is given. This helps when playing the songs with one hand louder than the other, and one playing staccato while another playing legato. A student first learns the skill in the exercise before applying it to a song.

Scales

Another supplemental book piano teachers often use is scales. In “Drill & Excel On the Piano,” each chapter has one key signature (except the recap chapters), and all the songs, exercises, and scales will be in that key. This makes everything they’re learning correspond to each other and creates a clear path for learning. Also, most scale books show the scale by notation. Playing scales by reading the notes may not help the student remember what sharps or flats are in each scale and key signature, or even understand them. In the “Drill & Excel On the Piano” series, the student plays scales by knowing what’s in each key signature. This helps the student have better retention and understanding of the scales, which is the foundation for learning music theory.

Intervals

Intervals are taught beginning in book 2, chapter 3. The emphasis in book 1 and book 2, chapters 1 and 2, are reading fluently and exercises to acquire the skill of playing. Chapter 3 of book 2 starts by showing the staff’s intervals in the key of C (C/D, C/E, C/F, C/G, etc.), with the interval number beneath. However, it doesn’t stop with merely explaining intervals. There are multiple worksheets for the student to identify the interval number without counting. Once a student can identify the interval at sight, this helps in sight-reading. Without repetitive written assignments, most students are not able to identify them at sight.

Songs, songs, and more songs!

And finally, the best part of “Drill & Excel On the Piano” are all the beautiful songs written by author Kathi Kerr. As mentioned earlier, the songs correspond with the chapter’s key signature. Written melodically, a student will find themselves singing the songs apart from playing them on the piano. Starting from book 2, each piece is in a different style with a commentary written by the composer. And best of all, they’re fun to play!

Each book recaps the previous books

Whatever the student’s level, he or she can start with any book in this series, since from book 2, the first chapter is a recap of the previous books—this way, no critical steps, and information are missing. For a beginning student ages 8-adult, book 1 is recommended. If a student has played a little piano, they can start with book 2 that begins chapter 1 with hands together. This book is also great for a self-taught student that plays well but may have missing information or someone taught incorrectly. Book 3 is excellent for the early intermediate student. And finally, book 4 is for the late intermediate student. There are more exercises, special exercises, rhythm drills, and lots of theory worksheets in books 3 and 4. “Drill & Excel On the Piano Book 5” is set to come out in late 2021 for the advanced student.

My first experience with this piano method book

When I had finished book 1, I used it on the students I was teaching at the time (I called them my guinea pigs). One of my students in particular had struggled in reading. However, when he started playing the multiple songs in each position, he was so accomplished at reading, he began sight-reading the songs nearly perfectly by the end of the chapter! I remember feeling so at ease and thinking “The book is doing all the work!” It was so much fun to see him go from struggling to sight-reading!

Order today and enjoy teaching

Order your copy of “Drill & Excel On the Piano” to relax and have a great time teaching your students, knowing they’re getting all the essential steps. Using drills and repetition, your students will have a deep understanding of all concepts and play the piano like a pro. It’s exciting to see the students’ progress and growth. If you’re a piano teacher who hasn’t registered, click here to sign up to receive discount codes for free shipping and 50% off your first copy, then free shipping and 20% off all recurring orders! Thank you for your passion and dedication to teaching private piano. We welcome your comments and suggestions to this post.

Kathi Kerr - owner Melody Music Publishers

Kathi Kerr founded Melody Music Studios in 1989, a nationwide music instruction studio. In 2017, she founded an independent publishing company called Melody Music Publishers. They offer piano and singing method books using small steps and repetition, how students think and learn.

Piano Method Books That Make Teaching Easy! Read More »

Piano Method Books

Best Piano Method for Beginners?

There are as many different piano methods and approaches to teaching piano as there are vehicles. Each method has their own way of teaching. That’s actually good, because everyone learns in their own way. The experts have defined learning into seven categories: 1) Visual (Spatial or “watching”) 2) Aural (Listening) 3) Verbal (speaking) 4) Physical (Kinesthetic, or by “doing”) 5) Logical (Mathematical) 6) Social (Interpersonal or learning in a group setting) and 7) Solitary (Intrapersonal or learning on your own).

How To Choose the Method

Deciding “how” to teach a beginning piano student (or any instrument), can be more challenging than an intermediate student that has already developed a skill and a strong foundation. So how do we know what piano method will be best for each student? It starts with 2 things: 1) being familiar with each method, and 2) knowing how each student learns. In teaching over 30 years, I’ve enjoyed picking the student’s brains and figuring out how he or she learns. One thing I’ve found ALL students have in common; learning to play an instrument is HARD! Even students that have a natural musical talent is going to struggle when first learning. This is the primary reason, I believe, students quit lessons while in the beginning level.

Quick Summary for Method Books

The most well-known and popular methods are the piano method books. There’s probably 10 or more commonly used books. Most method books teach a little note reading, some theory (mostly intervals, I-IV-V-I triads, and Alberti bass), some may include a few exercises, and they all include multiple songs. Most will have several kinds of books within each level, so the student may have 3-4 books at a time. What they all have in common is there is almost nothing mentioned of rhythm, and they have a fairly fast progression. Early in my teaching, I realized they didn’t offer enough repetition in note reading and rhythm to create a fluency in reading music. So I wrote a “Note Reading Workbook” and “Rhythm Workbook” to supplement the method books. This seemed to help, but I found students were still frustrated in learning from the traditional method books.

Suzuki Method

There are also certified methods. Suzuki Method uses the “watch and copy” approach, the #1 style of learning mentioned earlier. This is great for young children who may not have the ability to learn by the other learning styles, which involve more maturity. It creates a quick way for young students to play songs. I think of this type of learning as superficial, since a student may not understand what they’re playing. In my view, it may be great to start a young student with this method, but not a permanent teaching method as the student gets older.

Orff Method and Kindermusik

The Orff Method exposes young students to music and is best used in a group setting. It combines music, movement, drama, and speech into lessons that are similar with how children play. KinderMusik is a group program for the child and adult, based on these principles. They start as young as infancy through 7 or 8.

Dalcroze Method

The Dalcroze Method features interactive games and exercises that help students learn to trust their ideas and develop their own intuitions. While these methods are great to expose the young student to music, it doesn’t teach the skill of playing a specific instrument. However, these methods may be useful to integrate in the lessons. These methods (other than Suzuki) may be best for the kinesthetic or “physical” type of learner, #4 of the learning styles mentioned above.

Quick and On Line Piano Methods

Then there’s the ever growing “learn to play 3 songs in 3 weeks” type of methods. These methods don’t offer a deep understanding on the piano, but is more of a “quickie” on playing chords and simple melodies. This is actually fine for older students that want to learn to play their favorite song without hours of learning to read music. However, it’s not a serious way to study and learn the piano. There’s also programs that offer a subscription package to learn on the computer. I believe they can be useful, but students that may be excited at first, may drift off when it gets difficult with no one there to guide them. They also do not include a lot of needed information for the student, or watch how the student is playing. This is similar to learning from a video on Youtube, where the student is not being guided by an instructor that can watch him or her play.

Small Steps Using Drills & Repetition

I mentioned earlier that I had written supplemental workbooks to help the student learn to read notes and rhythm. In 2017, I decided to write my own line of piano method books to include everything needed in one book. I also wanted it to have more information and more songs within each level to create a fluency in reading. My approach can be summarized into these words “small steps using drills and repetition”. While these words may not sound “fun”, I have found students enjoy playing when they’re able to master each step. What causes frustration is not understanding and moving too quickly. By taking small steps and using repetition, the student actually ENJOYS reading and playing the piano.

Drill & Excel On the Piano

Piano Method Series “Drill & Excel On the Piano”

This piano method book series is called “Drill & Excel On the Piano”. There are 4 books in this series with 3 chapters each and over 100 pages. Each book takes about a year to complete. Books 1 & 2 have have 7 parts to each chapter: 1) Note Reading and interval worksheets 2) Rhythm drills 3) Scales 4) Exercises 5) Special exercises for specific skills needed 6) 20 original songs per chapter, and 7) Write your own song. The “write your own song” page not only promotes creativity, but a deeper learning. Books 3 & 4 have 6 parts: 1) Interval worksheets 2) Rhythm drills 3) Scales 4) Exercises 5) Special exercises and 6) 20 original songs per chapter.

Why Original Songs?

Why did I write the songs? Most method books boast their books have familiar songs the student will enjoy playing. The problem with that is how do you (as the teacher) know if the student is reading the notes or playing by ear? Since all songs are original in “Drill & Excel On the Piano”, the student will have to read them and not rely on being familiar. Also the songs are written to teach what is taught in the chapter, as well as being fun to play. Books 3 and 4 include a variety of different styles, from classical, samba, boogie, pop, jazz, to rag time. When a student can read music on their own fluently, it makes it FUN to read and play songs. No more needing to have someone play it for them.

Piano and Singing Method Books Coming Soon

Coming soon is “Drill & Excel in Sight Singing”! If you’re a vocal instructor or vocal coach, this will help you teach the art of sight singing so the student can read and SING the notes without them being played. This is great for singing in a choir or the harmony parts as well as classical music. And book 5 of the “Drill & Excel On the Piano” will be available by the end of 2020. This will be for the early advanced student.

Teachers Receive Free Shipping and Discounts

If you register as a teacher, you’ll receive free shipping and the first copy of each book at 50% off!. You’ll also be notified of new books coming out, with a 50% discount for each new book. If you order for your students, you’ll receive free shipping and 20% off. This discount never expires and can be used with each order. It’s my way of thanking you for using my books, and for doing the best job in the world, sharing your passion of music to others!

Kathi Kerr - owner Melody Music Publishers
Kathi Kerr founded Melody Music Studios in 1989, a nationwide music instruction studio. She also founded Melody Music Publishers in 2017, an independent piano method books written how students think and learn.

Best Piano Method for Beginners? Read More »